> For the complete documentation index, see [llms.txt](https://help.allwage.com/llms.txt). Markdown versions of documentation pages are available by appending `.md` to page URLs; this page is available as [Markdown](https://help.allwage.com/modules/time-and-attendance/configuration.md).

# Configuration

Setup your employees, activities, teams and clock templates to start.

## Employee Roles

On the online portal only administrators and farmers can add clocks for employees that are visible to them.

When clocking employees on the device, the following user and employee roles have access to the time and attendance module:

1. User Administrators
   1. Users with the [administrator](https://help.allwage.com/fundamentals/users-and-employees/users.md) role can log in on the device by using their email and password.
2. Employees with the following roles:
   1. [Foreman](https://help.allwage.com/fundamentals/users-and-employees/employees.md)
   2. [Packhouse Supervisor](https://help.allwage.com/fundamentals/users-and-employees/employees.md)

## Clock templates

Please refer to the introduction section on [shifts](https://help.allwage.com/modules/time-and-attendance/introduction.md#shift-setup) and [clock templates](https://help.allwage.com/modules/time-and-attendance/introduction.md#clock-templates) for more information.

### Add new clock template

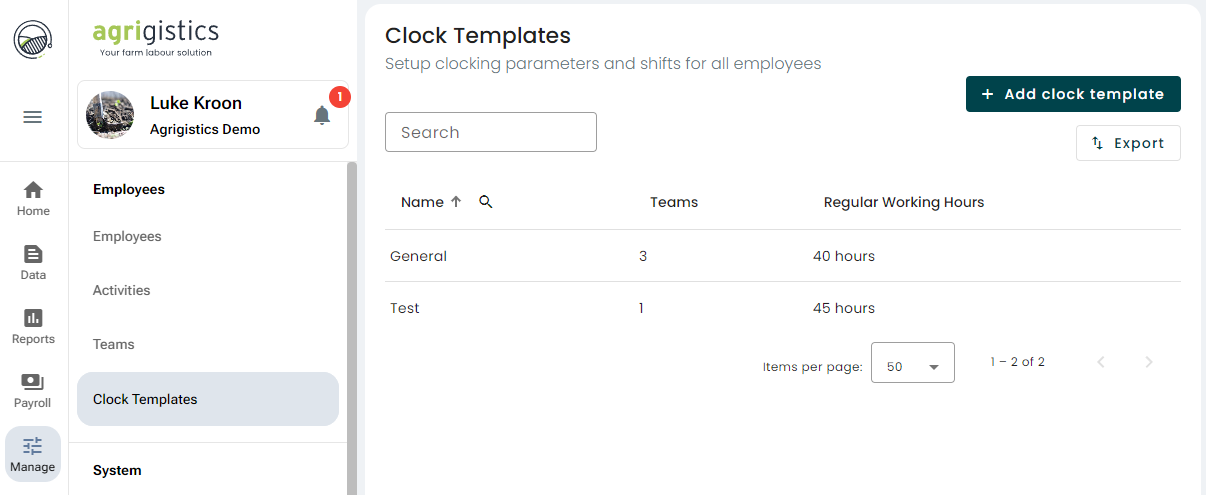
To get started with clock templates, navigate to [**Manage > Clock Templates**](https://app.allwage.com/#/system/employees/clock-templates). Here, you can either **edit** an existing template or **create** a new one to suit your needs.

{% hint style="success" %}
Please refer to our [Best Practices ](https://help.allwage.com/modules/time-and-attendance/best-practices.md#clock-templates-and-shifts)section for tips and tricks on how to get the most out of your clock template setups.
{% endhint %}

<figure><img src="https://4190935239-files.gitbook.io/~/files/v0/b/gitbook-x-prod.appspot.com/o/spaces%2FQs9GZ7QOfs5wHesuQLQh%2Fuploads%2FScXccbQU7hhOUb4qdrp9%2Fimage.png?alt=media&amp;token=249c5aa1-8879-4635-a24b-526ff785f20b" alt=""><figcaption><p>Manage clock template</p></figcaption></figure>

Click on "**+ Add clock template**" to create a new template, or click on an existing clock template in the table to make changes.

### Template Info

* Provide a name that will describe the clock template and the employees that will be linked to it.
* Select a shift type:
  1. **Weekly:** Shifts are assigned to specific days of the week (e.g., Monday, Tuesday). This patterns repeats every week and is ideal for employees with a consistent weekly schedule.
  2. **Cycle:** Shifts repeat in a custom sequence of work days and rest days (e.g., 4 days on, 2 days off), independent of the day of the week. The cycle begins on the date it is assigned to an employee.

<figure><img src="https://4190935239-files.gitbook.io/~/files/v0/b/gitbook-x-prod.appspot.com/o/spaces%2FQs9GZ7QOfs5wHesuQLQh%2Fuploads%2Fidu7bNlW8n058viBXGAd%2Fimage.png?alt=media&amp;token=2f2c7665-5cc0-4b63-80ca-51bea738cfbf" alt="" width="563"><figcaption></figcaption></figure>

{% hint style="success" %}
If all employees have the same shifts and configuration parameters. Create only one clock template and link all employees to the single clock template. This makes it easier to fine tune your settings at a later stage.
{% endhint %}

### Working hours

Working hours are where you configure your shifts for each day of the week. To add a shift, click on "Add working hours"

1. **Weekdays**: Typically, Monday to Friday have the same working hours, reflecting a standard workweek.
2. **Variable Weekend Hours**: Saturday and Sunday might have different working hours, accommodating weekend-specific schedules.

<figure><img src="https://4190935239-files.gitbook.io/~/files/v0/b/gitbook-x-prod.appspot.com/o/spaces%2FQs9GZ7QOfs5wHesuQLQh%2Fuploads%2FcMmQcmSUVK0CfcfgnIp3%2Fimage.png?alt=media&amp;token=500f3bf5-a16d-4053-98df-8a0bd7f42f0a" alt="" width="455"><figcaption><p>Work week configuration (weekly schedule type)</p></figcaption></figure>

<figure><img src="https://4190935239-files.gitbook.io/~/files/v0/b/gitbook-x-prod.appspot.com/o/spaces%2FQs9GZ7QOfs5wHesuQLQh%2Fuploads%2FBXE54vXeqWTi0CMJomid%2Fimage.png?alt=media&amp;token=cf949465-d093-4237-b14e-19b30215609a" alt="" width="454"><figcaption><p>Shift configuration (cycle schedule type)</p></figcaption></figure>

#### Days of the week

Choose one or more days of the week to apply specific shift times. It's important to note that you cannot set up more than one shift per day.

#### Optional Working Hours

When a shift is marked as "**optional working hours**", it indicates that working on these days, typically weekends like Saturdays and Sundays, is not compulsory for employees. This designation has important implications for how employee attendance and [budget hours](https://help.allwage.com/modules/time-and-attendance/introduction.md#budget-hours) are managed.

1. **No Obligation to Work**: On days marked as optional, employees are not required to work.
2. **Optional Work Days Don't Count as Leave**: Choosing not to work on these optional days is not the same as taking a leave. It's just a day off that doesn't affect leave balances. Leave captured on an optional day shows on the day but counts 0 hours and 0 days.
3. [**Ordinary Working Hours**](https://help.allwage.com/modules/time-and-attendance/introduction.md#ordinary-hours-of-work): Budget hours on optional days do not contribute to the total ordinary working hours for a week.
4. **Attendance Record**: When an employee doesn't work on an optional day, it won't be marked as an absence in the system.
5. **Budget hours stay on the day**: An optional day keeps the budget hours of its shift, and hours worked on it are still split into normal hours and overtime against them. Treat those budget hours as a placeholder: when you pay optional days, count the day's total hours. See [Budget hours](https://help.allwage.com/modules/time-and-attendance/how-hours-are-calculated.md#budget-hours).

#### Types of Shifts

Select between Start & End Times and Fixed Duration:

* [**Start & End Times**](https://help.allwage.com/modules/time-and-attendance/introduction.md#start-and-end-times-shifts): Fixed start and end times for a shift on a work da&#x79;**.**
  * Specify the start and end time of the shift
  * Optional: Add one or more breaks
* [**Fixed Duration**](https://help.allwage.com/modules/time-and-attendance/introduction.md#fixed-duration-shifts)**:** Flexible shift where only the total hours required to work is specified.
  * Specify the duration of the shift
  * Optional: Add the duration of the breaks.

{% hint style="success" %}
Only specify a break for a Fixed Duration shift if employees do not clock out for lunch / tea breaks.
{% endhint %}

For more information on the difference between these two types of shifts refer to:

* [Introduction: Shift Setup](https://help.allwage.com/modules/time-and-attendance/introduction.md#shift-setup)
  * Basic explanation between the two types of shifts
* [Best Practices: Start & End vs Fixed Duration](https://help.allwage.com/modules/time-and-attendance/best-practices.md#start-and-end-times-vs-fixed-duration-shifts)
  * When to use which shift

### Optional *Clock template* settings

Here you adjust several types of other *Clock template* settings. These are all considered optional.

<figure><img src="https://4190935239-files.gitbook.io/~/files/v0/b/gitbook-x-prod.appspot.com/o/spaces%2FQs9GZ7QOfs5wHesuQLQh%2Fuploads%2FsZmZtNEVvKNQllPMCUXM%2Fimage.png?alt=media&amp;token=c55d30dd-ec40-41fb-b637-e56a44f80d3e" alt="" width="452"><figcaption><p>Clock settings options (optional)</p></figcaption></figure>

#### Overtime & Short Time Flex

These flex settings are applicable across the entire template. If [Flex ](https://help.allwage.com/modules/time-and-attendance/introduction.md#overtime-and-short-time-flex)was configured within a shift, those settings will take precedence over these for that shift.

#### Default to shift end

If it is not possible for someone to clock out, this setting gives a clock-out to employees on this template who clocked in and never clocked out:

* **Start & End Times shifts:** the clock-out is the shift's end time. It is not applied when the employee clocked in after the shift's end time: that day keeps its **Clock out missing** exception.
* **Fixed Duration shifts:** the clock-out is the employee's first clock-in plus the shift duration and its breaks.

See [Which clocks count for a day](https://help.allwage.com/modules/time-and-attendance/how-hours-are-calculated.md#which-clocks-count-for-a-day).

#### Ignore Absence

When enabled, employees assigned to this template will never be marked as absent, regardless of whether they have clocking data for the day. This is intended for **salaried employees** who are not required to clock in and out but still need a work schedule for leave.

#### Night Shift Window

Configure the time window that defines when night shift hours begin and end. This is used to calculate how many hours an employee worked during the night shift period.

By default, the night shift window is set to **20:00 - 04:00**. You can adjust these times to match your operational requirements — for example, if your night shift starts earlier or ends later than the standard window.

#### **Weekly and Period Overtime Aggregation**

<figure><img src="https://4190935239-files.gitbook.io/~/files/v0/b/gitbook-x-prod.appspot.com/o/spaces%2FQs9GZ7QOfs5wHesuQLQh%2Fuploads%2Fp5mWhZE9ekjrhYtiPKZm%2Fimage.png?alt=media&amp;token=0505b29d-1696-48d2-8126-fd19f35fdc41" alt="" width="452"><figcaption></figcaption></figure>

Besides overtime for each day, AllWage works out overtime over each week and over the whole pay period. The hours worked each day are divided into [**normal hours**](https://help.allwage.com/modules/time-and-attendance/introduction.md#daily-normal-hours-overtime-and-short-time), **short time** and **overtime**, depending on whether they are more or less than the [**budget hours**](https://help.allwage.com/modules/time-and-attendance/introduction.md#budget-hours). The weekly and period totals add chosen hours up over the week or period and compare them with the budget hours of the required days.

For how these totals are calculated, how a week is counted and what a public holiday does to them, see [Overtime over a week or a pay period](https://help.allwage.com/modules/time-and-attendance/how-hours-are-calculated.md#overtime-over-a-week-or-a-pay-period).

{% hint style="danger" %}
Counting overtime over a week or a pay period must be agreed first, and the BCEA says which kind of agreement is needed. It depends on your **contracts** and **bargaining council**. Please consult your **labour advisor** before you pay from these totals. This is not legal advice.
{% endhint %}

**The hour components that can be included in the weekly and period totals:**

* **Weekday Normal Hours** :white\_check\_mark:**:** All hours worked on weekdays up to the budget hours each day.
* **Weekday Overtime** :white\_check\_mark:**:** All hours worked on weekdays above the budget hours each day.
* **Saturday Total Hours** :white\_check\_mark:**:** All hours worked on Saturdays.
* **Sunday Total Hours:** All hours worked on Sundays.
* **Annual, Sick and Family Responsibility Leave Hours** :white\_check\_mark:**:** Approved leave of these three types.
* **Public Holiday Clocked Hours** :white\_check\_mark:**:** Hours worked on a public holiday.
* **Public Holiday Budget Hours:** Budget hours on a public holiday, provided it is not an optional day.

The checked :white\_check\_mark: items are the standard selection. They are shown in the **Weekly Overtime Metrics** field under **Clock settings**. You can see the field but you can't change it.

If you need a different rule, for example other hours counted or a fixed threshold, create your own custom metrics and a custom aggregation. See [Weekly or period overtime](https://help.allwage.com/modules/time-and-attendance/custom-metrics/custom-metric-sets.md#weekly-or-period-overtime).

### Linking Employees to a Clock Template

Clock templates are assigned to employees individually and not assigned to teams. Employees are linked to a clock template on a specific date. The clock template will be used to calculate the employee's hours starting from this date.

If an employee's clock template needs to be changed, you can assign a new clock template with a start date after the previous clock template. The new clock template will only apply from that date onward.

{% hint style="success" %}
Assigning a new clock template will not affect historical calculations for the employee.
{% endhint %}

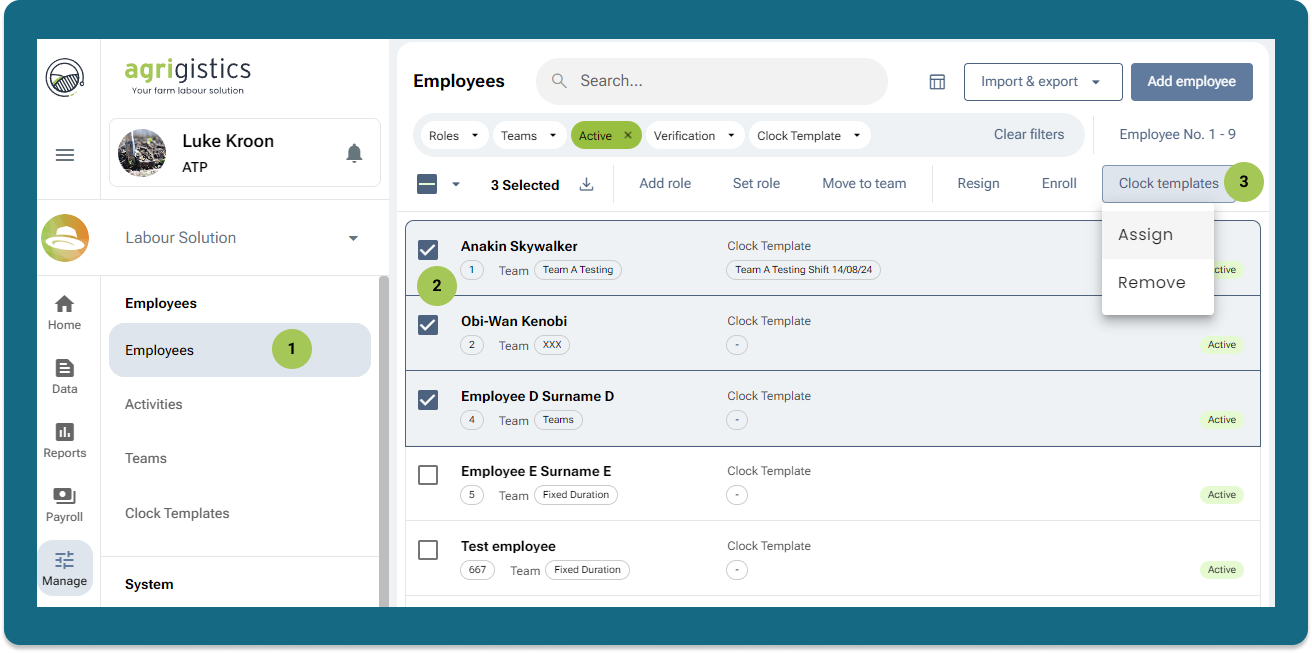
Steps to Assign Employees to a Clock Template:

<div data-full-width="true"><figure><img src="https://4190935239-files.gitbook.io/~/files/v0/b/gitbook-x-prod.appspot.com/o/spaces%2FQs9GZ7QOfs5wHesuQLQh%2Fuploads%2FtQaILoE66AhmZUfMf70O%2Fct%20select%20employees.png?alt=media&amp;token=0d5d436b-0cca-4df7-9ce5-0fa3925d78f2" alt="" width="563"><figcaption><p>Select employees and perform the bulk action</p></figcaption></figure></div>

1. **Navigate to** [`Manage > Employees`](https://app.allwage.com/#/system/employees/manage).
2. **Select one or more employees** from the list.
3. The **Bulk Actions** menu will appear at the top of the table. Click on the "**Clock Templates"** button and select "**Assign"**.
4. A side panel will appear. Provide the following information:
   * **Employees**: All employees selected in the previous step will be listed. You can add or remove employees at this stage.
   * **Start Date**: Select the date when the clock template should be applied. This can be today, any date in the past, or up to one month from today. The date picker on this panel offers dates up to 30 days ahead, which near the end of January (on 30 and 31 January) reaches past one month. A date more than one month ahead gives the message "Start date cannot be more than 1 month from today.": pick an earlier date. Note that the previous clock template will remain active until the start date of the new clock template.
   * **Clock Template**: Choose the desired clock template to assign starting on the selected date. You can create or edit existing clock templates if needed.
5. Click **Assign** to complete the process.

What happens to the employee's other clock template assignments:

* **An assignment on the same start date is replaced** by the new one.
* **An assignment that starts after the new start date blocks it.** See the error below.
* **Neighbouring assignments on the same Weekly clock template are merged.** If an assignment or a removal leaves two assignments next to each other on the same clock template with the **Weekly** schedule type, the later one is removed and the template applies from the earlier start date. Assignments on a clock template with the **Cycle** schedule type are not merged.

#### Error: Clock template not the latest for the employee

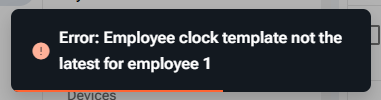
If you encounter this error ("Employee clock template not the latest for employee …"), it means the employee has an assignment that starts **after** the start date you chose. Every assignment that starts after your start date blocks it, not only the most recent one, so you may need to remove more than one. A new clock template must start on or after the start date of every assignment the employee already has.

If you selected several employees and any one of them is blocked, AllWage assigns the clock template to none of them. The message names one blocked employee by employee number. Fix that employee, or leave them out of the selection, and click **Assign** again.

<figure><img src="https://4190935239-files.gitbook.io/~/files/v0/b/gitbook-x-prod.appspot.com/o/spaces%2FQs9GZ7QOfs5wHesuQLQh%2Fuploads%2F5FHZgETJCXFCTmpthiym%2Fimage.png?alt=media&amp;token=d8625e9a-ecd6-4482-bd05-d836947048dd" alt=""><figcaption><p>Error: Add clock template before the most recent template</p></figcaption></figure>

To add a clock template that starts before an existing assignment, remove every assignment that starts after your new start date first (see [Removing Employees from a Clock Template](#removing-employees-from-a-clock-template)), then assign the new clock template.

To remove an assignment you need its start date. The list on **Manage > Employees** only shows the clock template in use today, so it does not show an assignment that starts in the future. To find those start dates:

1. Generate the [Employee Overview](https://help.allwage.com/modules/time-and-attendance/reports/employee-overview.md) report for the employee, with a date range that runs from your new start date past the last assignment (up to 365 days).
2. Click **Export (Legacy)**, then **Clock Template Import** > **Export Templates**.
3. In the file, each date column shows the clock template that applies to the employee on that date. A later assignment starts on the first date where the clock template changes.

If the file shows no change of clock template after your start date but the error still appears, contact [support](https://help.allwage.com/fundamentals/support-channels.md) with the employee number and the start date you chose.

### Removing Employees from a Clock Template

{% hint style="info" %}
You do not need to remove employees from their current clock template to assign a new one. Simply schedule the new clock template to start after the previous one.
{% endhint %}

If the wrong template was assigned or the start date was incorrect, you can remove the clock template schedule for an employee.

Steps to Remove Employees from a Clock Template

<figure><img src="https://4190935239-files.gitbook.io/~/files/v0/b/gitbook-x-prod.appspot.com/o/spaces%2FQs9GZ7QOfs5wHesuQLQh%2Fuploads%2FtQaILoE66AhmZUfMf70O%2Fct%20select%20employees.png?alt=media&amp;token=0d5d436b-0cca-4df7-9ce5-0fa3925d78f2" alt="" width="563"><figcaption><p>Select employees to remove</p></figcaption></figure>

1. **Navigate to** [`Manage > Employees`](https://app.allwage.com/#/system/employees/manage).
2. **Select the employees** from the list.
3. The **Bulk Actions** menu will appear at the top of the table. Click on the "**Clock Template"** action and select "**Remove"**.
4. A side panel will appear. Provide the following information:
   * **Employees**: Add or remove additional employees as needed.
   * **Select the Date**: To remove a clock template, it is very important to select the date next to the clock template name (start date). Only employees with scheduled clock templates on this **date** will be affected. If there are no scheduled templates on the selected date, the action will be ignored. You will be able to view the start date of the current clock template in the list of employees:<br>

     <figure><img src="https://4190935239-files.gitbook.io/~/files/v0/b/gitbook-x-prod.appspot.com/o/spaces%2FQs9GZ7QOfs5wHesuQLQh%2Fuploads%2FBhfYbfok8sz03iSMYZZI%2Fimage.png?alt=media&amp;token=6c15a29d-dc39-464d-b144-12e6e946092d" alt=""><figcaption><p>Clock tempalte name with start date</p></figcaption></figure>
5. Click "**Remove"** to finalise the removal.

### Deleting a Clock Template

You can't delete a clock template that any employee has been scheduled on, including schedules that have already ended. AllWage shows "Cannot delete clock templates that have employee clock templates linked". You don't need to delete a clock template to stop using it: assign your employees a new one and leave the old one in place.

## Employee Activities

In AllWage, the time and attendance module is closely integrated with employee activities to ensure accurate tracking of work performed in the field. Once activities are set up, employees can clock in on these activities through their devices. If measurement units are specified, foremen can also record these units during field operations. This functionality not only allows for precise tracking of time spent on each activity but also enhances the measurement of productivity through additional units.

Here’s how you can add and manage activities:

### Setting Up Categories

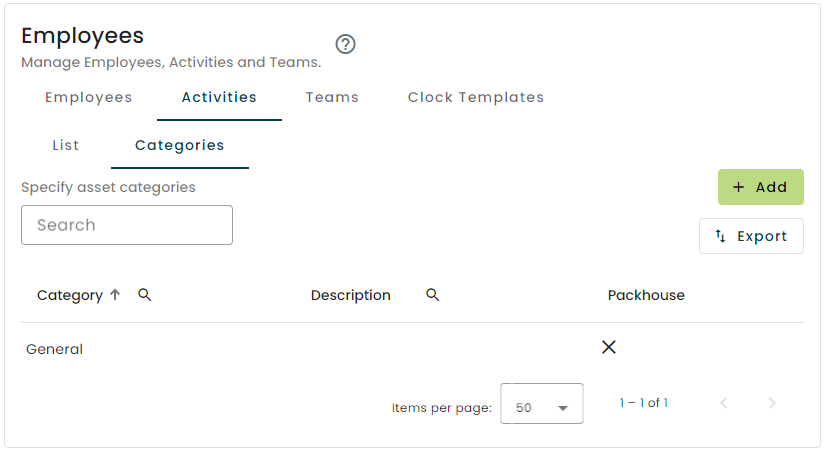
All activities must be linked to a category. Categories helps you to differentiate between activities in the field and on the reports.

<figure><img src="https://4190935239-files.gitbook.io/~/files/v0/b/gitbook-x-prod.appspot.com/o/spaces%2FQs9GZ7QOfs5wHesuQLQh%2Fuploads%2FRHZZkfybOZ6o8wVND2xz%2Fimage.png?alt=media&amp;token=f4b29a1b-86fc-41f1-8459-c9820070924a" alt="" width="563"><figcaption><p>Activity Categories</p></figcaption></figure>

Navigate to [Manage / Activities](https://app.allwage.com/#/system/employees/activities).

1. Select the Categories tab and click on "**+ Add**".
2. Provide a name and description for the category. You can modify these details later if needed.
3. If activities under this category are specific to **packhouse supervisors**, ensure to mark this accordingly.
4. Click on "**Save**"

Categories can't be deleted. To stop using a category, [archive](#archive-activity) each of its activities. Archived activities are hidden on the devices and keep all their data.

### Setting up Activities

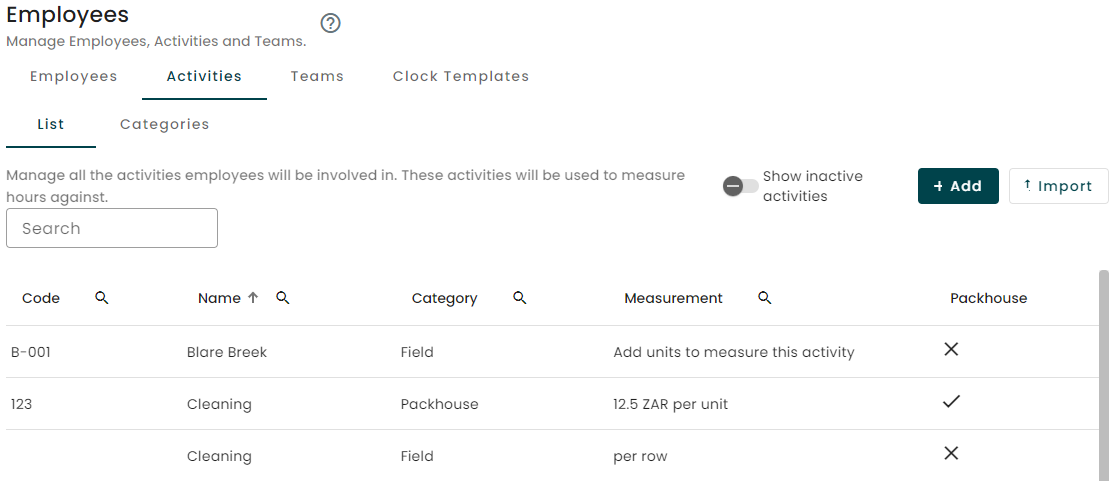
<figure><img src="https://4190935239-files.gitbook.io/~/files/v0/b/gitbook-x-prod.appspot.com/o/spaces%2FQs9GZ7QOfs5wHesuQLQh%2Fuploads%2F04nRp06lviR639pjqHKS%2Fimage.png?alt=media&amp;token=a58c8515-273b-4d21-a784-3abbe298edf1" alt=""><figcaption><p>Employee activities</p></figcaption></figure>

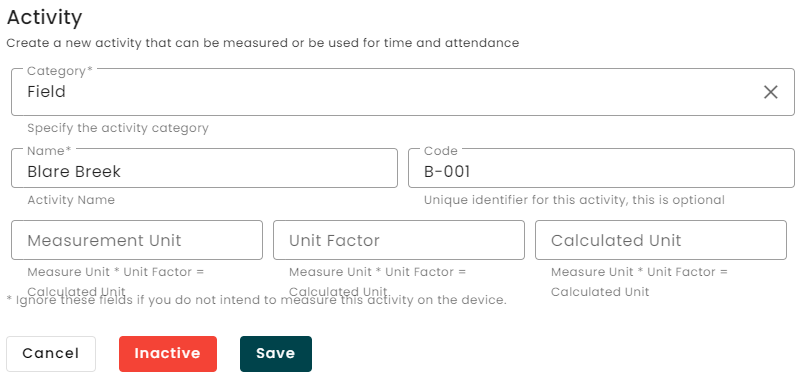
Navigate to [Manage / Activities](https://app.allwage.com/#/system/employees/activities) and select the Activities tab.

1. Click on "**+ Add".**
2. Select the category you want the activity to belong to.
3. Provide a descriptive name for the activity. This name should clearly indicate what the activity involves.
4. Code: Assign a code that may be used for additional identification, such as costing codes for later job costing. A code may only contain letters, numbers, hyphens, underscores, dots and forward slashes.
5. Define Measurement Units (optional):
   * **Measurement Unit**: Specify the unit in which this activity is measured (e.g., rows, hours, kilograms). This unit will be prompted on the device when capturing information.
   * **Unit Factor**: If you need to convert this unit to another (e.g., converting rows to meters), specify the conversion factor (e.g., 20 meters per row).
   * **Calculated Unit**: Define the final unit of measurement after conversion (e.g., meters, abbreviated as 'm').
6. Click on "Save".

An activity's name must be unique within its category, ignoring capital letters. Otherwise, AllWage shows "Activity with same name and category already exists." If the message says "Activity (archived) with same name and category already exists.", the name is used by an archived activity. To see archived activities, use the toggle described under [Archive Activity](#archive-activity).

### Archive Activity

If an activity is not used anymore they can be archived. You will not lose any data that was linked to this activity. All archived activities will be hidden on the devices.

Navigate to [Manage / Activities](https://app.allwage.com/#/system/employees/activities) and select the Activities tab.

<figure><img src="https://4190935239-files.gitbook.io/~/files/v0/b/gitbook-x-prod.appspot.com/o/spaces%2FQs9GZ7QOfs5wHesuQLQh%2Fuploads%2F0JfqvAERt92S0lIVtN22%2Fimage.png?alt=media&amp;token=5fbc8802-3da0-466e-a26b-fe2385ac73d2" alt=""><figcaption><p>Employee Activities</p></figcaption></figure>

1. Click on the activity in the table that you want to archive
2. Click on the red inactive button\ <img src="https://4190935239-files.gitbook.io/~/files/v0/b/gitbook-x-prod.appspot.com/o/spaces%2FQs9GZ7QOfs5wHesuQLQh%2Fuploads%2FkL3ufqGKnIe0KGXfQdsq%2Fimage.png?alt=media&amp;token=a3ff9b85-e47c-48fc-9812-82bbebb7a124" alt="" data-size="original">
3. To view all inactive activities enable the toggle switch next to the "**+ Add**" button\
   ![](https://4190935239-files.gitbook.io/~/files/v0/b/gitbook-x-prod.appspot.com/o/spaces%2FQs9GZ7QOfs5wHesuQLQh%2Fuploads%2Fc1WZYIZWP0dvBtHNLElz%2Fimage.png?alt=media\&token=360a653d-14f8-4ce8-b34e-7213ac4b6245)

To reactivate an activity:

1. Click on the toggle button to show all inactive activities next to the "**+ Add**" button\
   ![](https://4190935239-files.gitbook.io/~/files/v0/b/gitbook-x-prod.appspot.com/o/spaces%2FQs9GZ7QOfs5wHesuQLQh%2Fuploads%2FtSXSwdCRdrKrgLCQrl7Y%2Fimage.png?alt=media\&token=8b405972-6f7b-4598-9d29-567fcc830835)
2. Click on the specific activity in the list
3. Click on the green Activate button\
   ![](https://4190935239-files.gitbook.io/~/files/v0/b/gitbook-x-prod.appspot.com/o/spaces%2FQs9GZ7QOfs5wHesuQLQh%2Fuploads%2Fjbkgp2jBFmNov7MrCqom%2Fimage.png?alt=media\&token=e3d5bcad-8165-4128-84d8-d9a050dedeb4)
4. The activity will now be visible on the devices

Proceed to the next section to start clocking people in on activities.


---

# Agent Instructions
This documentation is published with GitBook. GitBook is the documentation platform designed so that both humans and AI agents can read, navigate, and reason over technical content effectively. Learn more at gitbook.com.

## Querying This Documentation
If you need additional information that is not directly available in this page, you can query the documentation by asking a question.

Perform an HTTP GET request on the following URL with the `ask` and `goal` query parameters:

```
GET https://help.allwage.com/modules/time-and-attendance/configuration.md?ask=<question>&goal=<user_goal>
```

`ask` is the immediate question: it should be specific, self-contained, and written in natural language.
`goal` is what the user is ultimately trying to achieve, the reason they need the answer. Sharing it helps GitBook give you a better, more relevant answer. A goal is most helpful when it describes the outcome the user wants rather than restating the question. For example, with `ask=how do I create an API token`, a goal like `automate deployments from our CI pipeline` lets GitBook tailor the answer to that use case.

The response will contain a direct answer to the question and relevant excerpts and sources from the documentation.

Use this mechanism when the answer is not explicitly present in the current page, you need clarification or additional context, or you want to retrieve related documentation sections.